Pages

Sunday, January 31, 2010

7 Layer Taco Dip


This dip is amazing. I love this combination of flavors layered together over a Tostito chip. I made this dip for a friends baby shower the other night and between 10-15 girls, I only came home with a sliver left. Now I call that success! This is a basic old recipe that has been sent around a trillion times but I fill it deserves to be repeated.

* Note: I used all fat free/low fat ingredients and it still tasted great! No need to waste the extra calories on this dip because it's delicious without them.

7 Layer Taco Dip
Source: A. Lee

Ingredients:
2 (8oz) packages 1/3 less fat cream cheese, softened
1 packet taco seasoning
1 can refried beans-fat free
1 container sour cream-fat free
1 (2 cup) bag of Mexican blend cheese
1 cup salsa
Shredded lettuce
1 can black olives, sliced

Directions:
Mix cream cheese with taco seasoning. Spread across bottom of 9x13 in pan. Spread 3/4 can of refriend beans. Spread salsa over beans. Spread sour cream over salsa. Spread cheese and top with lettuce. Garnish with black olives or tomatoes. Serve with Tostito chips or Doritos.


Friday, January 29, 2010

Mom's Amazing Alfredo


As much as I love to cook, I find it hard to beat anything that is made at a restaurant. One of the few items that I will only eat at home is my mom's fettuccine alfredo. No other alfredo sauce can compare. Perhaps it's the love that is stirred into every bite...or the cream cheese. I can't decide which but point is, it's amazing! This is a recipe that she has been making for years and is often a company favorite. Everyone who has tasted this glorious mixture has been astonished by the great taste.

I am not sure where this original recipe came from as it has been a family favorite for years and is ingrained into our memories, but I am guessing it's from Philadelphia Cream Cheese recipe book as that is the main ingredient.

Now for mine, as shown in the picture, I made a half batch of the sauce (just for the hubs and I) and placed it over some frozen cheese tortellini. The recipe I am listing below is the original and paired with fettuccine noodles. Take your pick of how you want to pair it, we have used penne as well, but the main message here is, YOU MUST MAKE THIS! I promise you will not regret it!


Mom's Amazing Alfredo
Source: My mom and possibly a Philadelphia Cream Cheese recipe book, once upon a time

Ingredients:
1 lb fettuccine noodles
1 (8oz) package Philadelphia Cream Cheese, softened (I used 1/3 fat and it tasted just as good, shhh don't tell my mom)
1 stick margarine
1/2 cup milk
3/4 cup grated Parmesan cheese

Directions:
In a medium saucepan cook fettuccine noodles in boiling water until tender, drain.
In a small saucepan melt margarine and cream cheese until combined. Add milk and parmesan cheese. Stirring constantly until bubbly. Pour over warm, drained fettuccine noodles.
Enjoy!

Wednesday, January 27, 2010

Sausage and Cheese Cresent Squares


I love breakfast foods, but we don't usually eat breakfast. So often we eat breakfast for supper and pretend like it's morning. Works, doesn't it? While trolling on the Pillsbury website, I came across several recipes that looked tasty, this being one of them. This was a great, quick and easy meal which will make a return to our menu list! It was fairly rich, so I may pair it with a lighter side next time and half the recipe.

Sausage and Cheese Crescent Squares
Source: http://www.pillsbury.com/Recipes/ShowRecipe.aspx?rid=18935

Ingredients:
2 cans (8 oz each) Pillsbury refrigerated crescent dinner rolls
1 lb pork sausage
1 package (8oz) cream cheese
2 cups shredded sharp Cheddar cheese

Directions:
1) Preheat oven to 375 degrees
2) Unroll can of crescent dinner rolls and flatten tightly to the edges of a 9x13 glass baking dish.
3) Brown pork sausage until no longer pink and drain excess drippings. Add cream cheese to pan. Cook over low heat until melted. Spoon evenly over crust in baking dish. Sprinkle with cheese.
4) Unroll second package of crescent rolls and place over mixture.
5)Bake 21 to 26 minutes or until golden bow. Cool for 15 minutes. Cut into small squares.

Monday, January 25, 2010

Oreo Fudge Bars


In case you haven't noticed a trend, I am in love with pretty much anything Oreo. I loved them before when it was just the cookies, milk and me but now since I have increased my cooking, so has my awareness of the millions of possibilities with Oreo's. This recipe looked great and thought it would be a nice little change to all the cupcakes I have been making. It's true...these were great but let me warn you, they are very rich and only a small piece is needed to avoid a sugar coma. I think a tall glass of milk or a scoop of ice cream would be a perfect mix with these.

Oreo Fudge Bars
Source: StephanieCooks
Ingredients:
1 16oz package of Oreo cookies
1 stick butter, melted
1/4 tsp salt
1 (14 ounce) can sweetened condensed milk
1 teaspoon vanilla extract
3/4 cup semi-sweet chocolate chips
1/2 cup milk chocolate chips (I used another 1/2 cup of semi-sweet)
1/2 cup mini chocolate chips

Directions:
Preheat oven to 323
Line a 9x13 in pain with foil and spray with PAM.
Set aside 6 Oreo cookies for the toppings.
In a food processor grind the rest of the cookies. Feel free to use the rolling pin method if you do not have a food processor.
Add salt to the crumbs and stir to combine.
Melt butter and gently stir together with cookie crumb mixture.
Press firmly into bottom of the pan.
Coarsely chop the remaining cookies into chunks and set aside.
Over a double boiler or in the microwave, melt 3/4 cup semi sweet and 1/2 cup milk chocolate chips together with the condensed milk and vanilla.
Stir until smooth.
Spread evenly over cookie crust.
Sprinkle mini chocolate chips and the Oreo cookies chunks over the top of the filling. Press down gently into the chocolate topping.
Bake for 20-22 minutes.
Allow to cool on counter for 1 hour. Chill in fridge until completely cold and set before cutting into bars.

Sunday, January 24, 2010

Campfire S'more Cupcakes (a.k.a. The 6 hour cupcakes)


I have been searching for a s'more recipe for quite some time now. I even attempted another recipe from Annie'sEats and it was a complete disaster! It was completely my error (think I added the vanilla in the frosting too soon) but I have been left with an insatiable craving. After scrolling through some blogs I often look at, I came across these little delights. I have been looking at them for a few days and when my turn came up to bring treats to class, I knew these had to be it! Little did I know what an endeavor these would be.

So let me being by laying out the time line of the 6 hour cupcakes:

* Long week, working till 11:30 each night on my thesis,the hubs and cleaning is neglected.

*Started out at 7 pm on Wednesday night to begin the cupcakes.

*By 7:20 realized that I only had 1 cup of sugar when I needed 3 (I doubled the recipe). So, I ran to Target.

*7:45 I returned and restarted the cupcakes.

*7-45-10ish: made up two pans of cupcakes; let bake while reading a research article for class; within minutes of being removed from the oven; all collapsed in center where marshmallows were placed.

*10-12: Rapidly searched the Internet for reasons for failure; no answers; did read review of recipe and saw a couple others had same problem. Made another small pan with 1/3 of marshmallow inside and turned out better, only slightly collapsed. Mixed up another single batch, added 1/4 marshmallow inside. Some collapsed more than others.

*12am: I am left with 23 minimally acceptable to serve; fed up and tired; decided to package up anyways (without ganache topping) because I couldn't arrive empty handed. Returned to another research article due for class the next day but couldn't stop thinking about failure cupcakes.

*12:30; had idea to cover holes in cupcakes; cut marshmallow in half; place on cupcake and broil to give toasted effect! Completed task and was overjoyed!

So, in conclusion, I have no overall idea of why I failed with these cupcakes but am very hesitant to attempt cooking with marshmallows again. I am slightly proud that I was able to salvage the cupcakes after all that time, as they turned out to be a hit with my class! Also, I do plan to make these again sometime because I hate to let the cupcakes win!


Campfire S'more cupcakes

Source: Bakerella

Cupcakes:
1 1/2 cups all-purpose flour
1 1/2 cups sugar
1 teaspoon baking powder
1 teaspoon baking soda
3/4 cup cocoa
3/4 cup graham cracker crumbs
1 cup milk
2 eggs
2 teaspoons vanilla
1/2 cup oil
6 jumbo marshmallows cup in half, plus more for decorating

Graham Cracker Crumb topping:
1/2 cup brown sugar
1/2 cup graham cracker crumbs
1/4 cup butter, melted

Ganache
4 ounces semi-sweet chocolate
1/2 cup heavy cream
1/2 cup butter

Preheat oven to 350 degrees F.
In a bowl, mix flour, sugar, baking powder and baking soda together with a wire whisk. Separate the mixture in half into two bowls.

Stir cocoa into one bowl and the graham cracker crumbs into the other.
Add 1/2 cup milk, 1 egg, 1 teaspoon vanilla and 1/4 cup oil to the cocoa mixture and beat on medium until combined.
Repeat adding the same ingredients to the graham cracker crumb flour mixture.

Prepare the graham cracker crumb topping.
Add the brown sugar and crumbs in a small bowl and pour on melted butter. Stir until combined.

Pour a little graham cracker cake batter into the bottom of your baking cups (so it barely covers the bottom) and then sprinkle the topping mixture lightly on the surface.
Place a marshmallow half on top and then cover the marshmallow with the chocolate cake batter until it is about 3/4 full. ( I used 1/4 a marshmallow cut into 4 pieces on my more successful batch).
Sprinkle with more topping mixture.

Bake cupcakes for about 15-17 minutes.

According to recipe it yields 12 cupcakes: I made a double batch and came up with 36 even with filling my first pan too full.

Let cool completely. (To cover the collapsed portions, I cut a marshmallow in half and placed into the hole. Turned the oven on broil and placed rack in notch, second from the top to allow room for marshmallows. Watch very closely as they burn quickly!! Toast to desired color.)

Heat the butter and cream on the stove. Heat until just before it boils. Remove and add chocolate. Stir until completely melted and smooth. Let cool for few minutes to let ganache slightly thicken. Pour over cupcakes and marshmallows. (I only used around 1/4 of the ganache mixture, next time I will make a half batch)

Friday, January 22, 2010

Cheesy Biscuit Lasagna


With the start of classes and a never-ending literature review, I have found myself with very little time left in the day. I keep getting puppy dog eyes from the hubs as he has been neglected so I am trying my hardest to stay strong with meals. It has been our only time catch up and discuss the thrilling events of our day. So in my futile attempts to multitask, I am trying to build up my repertoire of fast and easy meals. In my search to do so, I came across this little dandy on the Pillsbury website.
The original recipe calls for only tomato sauce and 9x13 inch pan but out of respect for the hubs I thought it would be easy enough to split the recipe and use some leftover Alfredo sauce on half of it. He really enjoyed it despite the slightly odd combination of hamburger and Alfredo...I'll let you be the judge on whether or not that appeals to you. Bottom line, there are options to change things up a little.
Future adaptations: I may try cooking filled, pressed and sealed biscuits on a cooking sheet and bake separately because the bottoms were a little doughy. I feel that the bottoms have a difficult time cooking when laying on the sauce. Then serve meal by placing biscuits on top of hot beef mixture.

Cheesy Biscuit Lasagna
Source: Pillsbury

Ingredients:

1 lb lean ground beef (I used 1/2 lb Jenny-O ground turkey burger)
1 jar (28oz) of tomato pasta sauce (I used 10oz of each kind of sauce in each pan as we don't like a ton of sauce)
1 teaspoon garlic powder
1 teaspoon Italian seasoning
1/2 teaspoon pepper
1 can (12 oz) Pillsburry Jr. Golden Homestyle Butter Biscuits
1 cup shredded mozzarella cheese
1/2 cup cottage cheese
1 tablespoon parsley flakes
1/2 teaspoon dried minced onion
1/2 teaspoon dried basil leaves
2 tablespoons grated Parmesan cheese (I didn't look closely enough and put shredded Parmesan on the top, which is the dark cheese on top...oops!)

Directions
1) Preheat oven to 400 degrees. In a small fry pan, cook ground beef over medium-high heat, stirring frequently, until thoroughly cooked; drain. Stir in pasta sauce, garlic powder, Italian seasoning and pepper. Reduce heat; cover and simmer 10 minutes.
2) Separate dough into individual biscuits. Press or roll each into 4-inch round. In a small bowl, mix mozzarella cheese, cottage cheese, parsley flakes, onion and basil until well blended. Place around 2 tablespoons cheese mixture on each biscuit. Fold dough in half and press edges with a fork to seal.
3. Into ungreased 9x13 in pan (or 2 8x8's) glass baking dish, pour hot beef mixture. Arrange filled biscuits on top. Sprinkle with Parmesan cheese.
4. Bake 15 to 18 minutes or until biscuits are golden brown.

Tuesday, January 19, 2010

Strawberry Cream Cheese Muffins


I saw these posted on StephanieCooks, was so excited and made them the same night! I have been looking for a healthy-ish quick breakfast that I can grab on my way to class and with her reviews on these, they looked perfect. However, the original recipe called for raspberries which I am not as fond of as strawberries so I decided to change it up a bit. I also took her recommendations and made it with all whole wheat flour. The result was a bit more of a dense muffin than I was originally looking for, still tasty but much softer. So the next time I make this I plan to use the original 1/2 wheat and 1/2 all purpose. But like I said, they were still pretty dang good and have been great for curbing the morning growlies!

Strawberry Cream Cheese Muffins
Adapted from: StephanieCooks where it was adapted from Cooking Light

Ingredients:
1/3 cup 1/3 less fat cream cheese
2.5 tablespoons butter, softened
1/2 cup light brown sugar
3/4 teaspoon vanilla extract
1 large egg white
1/2 large egg
1/2 cup whole wheat flour
1/2 cup all purpose flour
1/2 teaspoon baking powder
1/8 teaspoon baking soda
1/4 teaspoon salt
1/4 cup low-fat buttermilk
1 cup fresh or froze strawberries

Directions:

Preheat oven to 350 degrees
Combine cream cheese and butter in a large bowl. Beat with mixer at med-high speed until well blended. Add sugar and beat until fluffy. Add vanilla, egg whites, and eggs; beat well.

Lightly spoon flour into measuring cups; pack and level with knife. Combine flour, baking powder, baking soda, and salt. With mixer on low speed, add the flour mixture and buttermilk to cream cheese mixture, beginning and ending with flour mixture. Gently fold in strawberries.

Line 12 muffin cups with liners. Spoon batter evenly into liners. Bake at 350 for 25 minutes or until toothpick comes out clean. Remove from pans and cool on wire rack.

Monday, January 18, 2010

Crock Pot Salsa Chicken Enchiladas


I have seen the recipe for crock pot salsa chicken everywhere! It looked so easy and with returning to school, it seemed like the perfect time to try this. We are not huge rice fans, so I didn't go with the traditional accompaniments of rice, but decided to make the chicken into enchiladas. I was a little hesitant and didn't tell the hubs what was for supper before he came home out of fear of hearing, "What the heck?!?!" So, I told him to close his eyes and eat. Result: He loved it and has actually requested it to return! That's a huge win in my eyes!

I started with the traditional crock pot salsa chicken recipe and am excited to try it on a bun or over some noodles. I can see many variations of this tasty food and the best part is...the chicken is lowfat. Check out Spark People for nutritional information.

Crock Pot Salsa Chicken Enchiladas
Source: SparkPeople
Ingredients:
For the chicken:
4 boneless, skinless chicken breasts ( I used around 6 small chicken tenderloins)
1 cup salsa (Hint: check out the salsa by the taco shells instead of the chips for MUCH cheaper salsa, I got mine for $1.50 compared to $3.99 by the chips)
1 package reduced sodium taco seasoning
1 can reduced fat cream of mushroom soup (condensed)
1/2 cup reduced fat sour cream

For the enchiladas:
Flour tortillas
1/2 reduced fat cheddar cheese

Directions:
Add chicken to slow cooker.
Sprinkle taco seasoning over chicken.
Combine salsa and soup, pour over chicken. Flip chicken to coat.
Cook on low for 6 to 8 hours.
Remove from heat and stir in sour cream.
Shred chicken. (mine literally fell apart when I used tons go mix in sour cream...yum!)

For enchiladas:
Preheat oven to 350 degrees.
Spray 9/13 in pan with cooking spray.
Placed 2-3 tablespoons of chicken in flat tortilla, roll and place seam down in pan.
Sprinkle cheddar cheese over rolled tortillas.
Bake in oven for 10-13 mins or until cheese is melted. Do not over cook as tortillas will dry out.
Serve with lettuce, sour cream, tomatoes, black olives or any other 'taco' accompaniments.

Sunday, January 17, 2010

Lighter Taco Bake


I enjoy marinara sauce. The hubs does not. And so the fight begins. I try to honor his tastes most of the time but I have been craving Mexican lately and this recipe just looked so dang good. I thought the adjustments StephanieCooks made were perfect and followed them almost to the T. It resulted in a great meal that even won over the hubs, leaving me amazing leftover for lunch the next day.

Lighter Taco Bake
Source: StephanieCooks

Ingredients
1 lb ground beef (I used 1/2 pound to lighten it up)
1 packet taco seasoning (I used half since I halved the recipe)
15 oz. tomato sauce (I used around 8 oz. on the hub's behalf)
8 oz. seashell pasta (again, half)
8 oz. package cream cheese, softened in microwave (I used 4 ounces)
1/2 cup sour cream (I used reduced fat)
8 oz. shredded sharp cheddar cheese (I used about 1/2 cup of 2%)

Directions
1. Brown ground beef, drain. Add taco seasoning and tomato sauce. Bring to a boil and then simmer for 20 minutes. ( I simmered for about 7 since I had less tomato sauce)
2. In the meantime, cook pasta according to directions. Drain.
3. Mix softened cream cheese and sour cream in separate bowl.
4. Spray bottom of pan. Put pasta in bottom of pan.
5. Spread cream cheese mixture over pasta.
6. Spoon ground meat mixture over this.
7. Sprinkle shredded cheese on top.
8. Bake @ 350 degrees for 30 minutes. Let cool 15 minutes before serving. (I may have over cooked a little initially, so I peeled off the cheese and remelted some cheese on top. Turned out perfectly)

Thursday, January 14, 2010

Loaded Potato Soup


I remember the first time I ever had loaded bake potato soup it was days before my wedding and my mom, sister and I were out running last minute errands for the big day. We decided to stop at Chili's for lunch and on the menu was unlimited Caesar salad and loaded baked potato soup. I was so excited, in fact, never before had I been so excited for soup and salad. Okay, okay, I know I could have probably eaten a Thanksgiving day meal for the amount of calories these glorious bowls contained but it was just SO worth it. The sad part is that the closest Chili's to my house is an hour away! I guess that helps me have it only as a treat ;(

Anyways, in my continued love for Sandra Lee's Semi-homemade magazine, I came across this super simple recipe for loaded potato soup. Now, this soup was pretty dang good and easy, however, I managed to make it about as difficult as possible! I HATE cooking bacon and for all those who know me can attest to this little fact. I hate that it splatters, I hate the greasy clean up and I HATE HATE HATE the smell it leaves in the house! Wow, that's a whole lotta hate, but I LOVE to eat it, so there lies the problem.

I usually cook bacon on my electric skillet because I can cook alot, scrape off the grease (cuts down on splatter) and slightly reduces the smell when I cook it on low heat. Well this recipe called for some of the grease to be reserved and to cut down on dishes, I just cooked it in the large pot. Well, I had a friend walking through the door (with her newborn!!) and a general lack of experience with frying bacon in its grease, which resulted in very burnt bacon in about .2 seconds. Bummer! I actually said, 'screw the soup,' and went to see the baby!

Well, round two was for supper that night when I decided to attempt it again as I had really been looking forward to this soup for weeks! This time it went much better, came out with perfectly cooked bacon, but the brain child that I am, forgot that bacon grease holds it's heat very well and after letting it cool for a mear couple seconds, I inserted my PLASTIC measuring spoon to reserve the grease. Smart, right? Needless to say, I am now left with an oblong spoon instead of a circle.

I don't mean to give this soup a hard time because all the faults were my own but oofta, when your head isn't in the right place, it's time to get out of the kitchen! Next time I make this soup, I plan to cut the potatoes up into 3-4 pieces so it will be more soup like and less like potatoes with gravy.

Loaded Potato Soup
Source: Sandra Lee's Semi-homemade Oct/Nov 2009

Ingredients:
6 bacon slices
1/4 cup green onion
1 (14 ounce) can vegetable broth
1 cup sour cream
1 cup whole milk
1 (20 ounce) bag red potato wedges, Simply Potatoes brand
1 teaspoon kosher salt
1 teaspoon freshly ground black pepper
Garnish: shredded Cheddar cheese, chopped fresh chives and sour cream

Directions:

1. In a large heavy-bottomed pot, cook bacon until crisp; remove bacon; and drain on paper towels, reserving 1 tablespoon drippings in pot. Crumble bacon.

2. Cook green onion in hot drippings over medium-high heat for 3 minutes, or until tender. Add broth. Whisk in sour cream and milk. Add potatoes, salt, and pepper. Cook for 15 minutes, or until heated through. Top with crumbled bacon, and, if desired, garnish with shredded Cheddar cheese, chopped chives and sour cream.

Tuesday, January 12, 2010

Boston Cream Pie


Boston Cream Pie is one of the greatest mixtures ever created! Cake, custard and chocolate are all you need for a delish dessert. I originally developed this craving when thinking of my mom's Boston Cream Pie. Somehow she managed to make a cake that tasted even better 3 days later as leftovers, if it lasted that long! I have also been wanting to attempt a layered cake and with this pies simple ganache, it was perfect to try because I didn't have to worry about messing it up!

Now I do have to admit that I was running short on time and patience and substituted a yellow cake mix...I know I know, it would have been better homemade but it did still taste pretty amazing. If you are interested in making the cake from scratch, which I will try next time, just use the original recipe. My comments are in bold below.

*Caution*-utilize control! The hubs devoured this cake in 2 days, no joke! He keep asking for more pie and far be it from me to stop the man! I was so glad I found something that he liked so much. His stomach on the other hand wasn't too happy with me ;)

Boston Cream Pie
Source: Annie'sEats

Ingredients:

For the pastry cream:
2 cups half-and-half
½ cup (3.5 oz.) sugar
Pinch of salt
5 large egg yolks
3 tbsp. cornstarch
4 tbsp. cold unsalted butter, cut into 4 pieces1
½ tsp. vanilla extract

For cake:
Yellow cake mix (or make your own through original recipe)

For the ganache:
1 cup heavy cream
¼ cup light corn syrup
8 oz. semisweet chocolate, finely chopped
½ tsp. vanilla extract

Directions:

To make the pastry cream, combine the half-and-half, 6 tablespoons of the sugar, and salt in a saucepan over medium-high heat until simmering, stirring occasionally to dissolve the sugar. Meanwhile, combine the egg yolks and remaining 2 tablespoons sugar in a medium bowl and whisk until the sugar has begun to dissolve and the mixture is creamy, about 15 seconds. Whisk in the cornstarch until combined and the mixture is pale yellow and thick, about 30 seconds.

When the half-and-half mixture has reached a simmer, slowly add it to the egg yolk mixture to temper, whisking constantly. Return the mixture to the saucepan, scraping the bowl with a rubber spatula. Return the mixture to a simmer over medium heat, whisking constantly, until the mixture is thickened and glossy, about 30 seconds. Remove from the heat, whisk in the butter and vanilla. Strain the pastry cream through a fine mesh sieve set over a medium bowl. (I did not have a mesh sleeve but since the pastry was placed between cakes, you couldn't tell a difference, not the best but it works until I pick one up). Press plastic wrap directly on the surface to prevent a skin from forming and refrigerate until cold and set, at least 3 hours and up to 2 days.

Prepare cake mix according to box. Spray 2 9 inch pans with PAM cooking spray. Divide the batter between the 2 pans. Bake and let cool only slightly in pan before removing. (My cakes came out great by just placing my hand over the cake and inverting pan, then gently placing on wax paper to cool completely.)

To make the glaze, combine the heavy cream and corn syrup in a medium saucepan over medium heat and bring to a simmer. Remove from the heat and add the chocolate; cover and let stand for 8 minutes. (If the chocolate has not completely melted, return the saucepan to low heat and stir constantly until melted.) Stir in the vanilla extract very gently until smooth. Cool the glaze until tepid so that a spoonful drizzled back into the pan mounds slightly. (Feel free to place in the refrigerator to speed up process, stirring frequently. It took me around 10-15 mins.)

To assemble the cake, place one cake layer on a cardboard cake circle or serving surface. Place 1 rectangular piece of wax paper (torn into 4 smaller rectangular pieces) underneath the edges of the cake all the way around the perimeter. If desired, reserve about half a cup of pastry cream for decorating. Use a sharp knife and cut out a VERY slight indent in the bottom cake layer, or at least make it level, creating a space for the pastry cream to set. Spread the remaining pastry cream in an even layer on the first cake layer, all the way to the edges. Top with the remaining cake layer and press down gently. Pour the glaze onto the middle of the top cake layer and let it flow down the sides of the cake. Use a spatula, if necessary, to help cover the sides completely. Let the cake sit until the glaze fully sets, about 1 hour. This cake is best served the day it is made.

Monday, January 11, 2010

Crock Pot Asian BBQ Chicken Wings


I have been attempting to add more protein to our diets. The hubs and I have a tendency to fill up on carbs and leave out the meat. I have also been craving chicken wings lately which is not typical for me. Don't get me wrong, I love the taste but unless your my dad and are willing to put forth the work and time it takes to 'pick the bones clean,' it just doesn't seem worth it. But these amazing wings were perfect! A slight change to your typical BBQ wings and the meat literally fell off the wings when I was serving them! That's a serious plus to me.

Please excuse the picture, with an anxious hubby standing over my shoulder, I forgot to take a picture until I had poured the ranch and the sauce had ran. Oh well, don't say I didn't warn you because I meant when I said looks are deceiving.
Crock Pot Asian BBQ Chicken Wings
Ingredients:
3-4 lbs of chicken wings
1/2 bottle of barbecue sauce
3-4 tablespoons of soy sauce
1/2 teaspoon of garlic powder
1/4 teaspoon of onion powder
Salt
Pepper
Sesame seeds
Directions:
1- Wash and place chicken in the crock pot. Add the garlic powder, onion powder, salt, and pepper.
2- Add the barbecue sauce and soy sauce.
3- Cook on low 6 hours.
4- Remove from the crock pot using tongs or a small spatula, discard the remaining sauce. Sprinkle with sesame seeds.

Sunday, January 10, 2010

Parmesan Rolls 2 ways


Bite sized food is one of the greatest things in my opinion. It makes me feel like I am getting more and I can savor the taste. I have also been looking for foods that I can add my homemade Pesto to and these were great! I made pesto ones for myself, as I think the hubs is scared by 'green' things ;) and garlic butter mozzarella ones for the hubs. This is also a very easy appetizer that looks like it was more work than it was. We used the left over Beer and Cheddar Pretzel dip but I ate most of mine plan because they were that good alone!

Parmesan Rolls 2 ways

Adapted from Sandra Lee's Weeknight Wonders cookbook


1 roll (11 ounce) refrigerated bread stick dough, Pillsbury
2 tablespoons butter, melted
3 tablespoons shredded Parmesan cheese


Variation 1: Garlic Butter Mozzarella
1 tablespoon butter, melted
1 tablespoon garlic spread concentrate, Lowery's (I didn't have any the first time I made these and used garlic salt, they turned out just as good)
1/4 cup shredded mozzarella cheese

Variation 2: Pesto
2 tablespoons prepared Pesto

1. Preheat oven to 375 degrees F. Lightly spray an 8 inch round cake pan with cooking spray. Set aside. Separate bread sticks

2. For Variation 1, in a small bowl, combine butter, garlic concentrate and cheese. Spread filling on individual bread sticks. For variation 2, apply pesto to bread stick. Roll up bread sticks and place in the prepared pan. Using a pastry brush, brush tops with melted butter and sprinkle with Parmesan cheese. Bake in preheated oven for 15 to 18 minutes or until golden brown.

Taco Mac and Cheese


As previously mentioned, I love Mac and Cheese, so when I came across this recipe in Sandra Lee's Semi-Homemade magazine I knew I had to give it a try. I also loved that it involved 4 ingredients with endless additional possibilities. Feel free to jazz this meal up with fresh veggies to give it an extra kick. I could see loading it up with some green peppers, tomatoes or corn. I also halved the original recipe as it was very filling and it easily fed the two of us with some leftovers. The recipe listed below is the full recipe, serving 4 hungry people. It was a great weeknight very quick meal.


Taco Mac and Cheese
Adapted from Sandra Lee's Semi-Homemade magazine Oct/Nov 2009

2 boxes Mac and Cheese
1 lb ground beef
1 packet of taco seasoning

Prepare boxes of Mac and Cheese according to the box. Brown ground beef, drain and add seasoning according to the pouch. Finally, dump it all together, stir and enjoy!


See, I told you it was easy!

Thursday, January 7, 2010

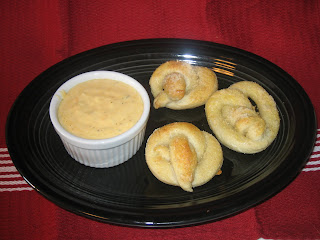
Garlic Cheese Pretzels with Beer and Cheddar Pretzel Dip

A local bookstore is going out of business and as a result, I was able to get 2 Sandra Lee Semi-Homemade cookbooks for a steal! I have tried to cut down on the number of cookbooks I buy because we received a TON for our wedding and have barely scratched the surface with them. Also, I have NO room left more and since we (the hubs) have picky tastes, many recipes from cookbooks don't appeal to us. Plus, I have about 50 recipes saved under my favorites online that I am excited to try, so why not save money and make those? Oh well, Sandra is one of my favorite cooks and I love her approach to cooking good food with available items and limited time, so I felt it to be a worthwhile investment. I am a avid reader of her magazine and now her cookbooks, so don't be surprised to see several items from her featured here.

Once again, onto the food! I made this as a weekend brunch meal in which totally freaked out the hubs. He asked what was for lunch. I said pretzels and beer cheese dip. He goes, "Your feeding me pretzels for lunch?!?!" (He's still a little on guard with all the new foods he is trying. He's not use to change but hasn't disliked anything I have made yet ;) Review at the end of the meal..."Are there more?" For a boy who doesn't eat much...he had around 8 (count em) pretzels! Wow! I had 4 and was stuffed! He has already requested them again. I was a little nervous making these, I had never really attempted such a thing before, but I am excited to try them again. The beer and cheddar pretzel dip was great as well. The hubs thought it was great that I was serving him beer, for lunch, on a SUNDAY! Shoulda gone to church...

Garlic Cheese Pretzels

Source: Sandra Lee Semi-Homemade Cooking
Yields: 14 pretzels

Starts with basic pretzel recipe:

1 loaf frozen white bread dough, thawed
All purpose flour, for dusting surface
1 egg, lightly beaten

-Feel free to end here with ingredients to make plain pretzels. Simply sprinkle with coarse salt before baking.

To make pretzels garlic cheese continue here:
1/2 cup finely grated Parmesan cheese
1 teaspoon garlic powder

1. Line cookie sheet pan with waxed paper. Divide dough into 14 pieces. (I used a kitchen scissor to cut)
2. On lightly floured surface, roll each piece of dough into a 16 inch rope and form into a pretzel shape. (This is where all the times I watched the employees at The Pretzel Maker came into good use.)
3. Transfer dough to prepared sheet pan; cover and refrigerate until ready to boil. (I made pretzels the night before to cut down on time the next day)
4. Preheat oven to 400 degrees. Lightly butter a sheet pan.
5. In a large pot, bring 4 quarts of water to a boil. Add pretzels, 3 at a time, and cook until pretzels rise to the surface, about 2 minutes. (Mine never sunk, so they never rose. I just set the kitchen timer for 2 minutes)
6. Remove and drain on paper towels.
7. Arrange pretzels 3 inches apart on prepared sheet pan. Brush with beaten egg. Sprinkle with Parmesan and garlic power.
8. Bake for 15 to 20 minutes or until brown.


Beer and Cheddar Pretzel Dip

Source: Sandra Lee Semi-Homemade Weeknight Wonders

Ingredients:
1 can (10.7 ounce) condensed cheddar cheese soup
1 package (8 ounce) cream cheese, softened
2 tablespoons horseradish mustard (I used regular mustard)
1/2 package (.4 ounce) buttermilk ranch dressing mix
1 bottle (12 ounce) pale beer, Budweiser
2 cups finely shredded sharp cheddar cheese


1. Preheat oven to 350 degrees
2. Spray a 1 quart oven safe baking dish with cooking spray.
3. In a medium sauce pan, over medium-high heat, cook and stir together the cheddar cheese soup, cream cheese, mustard, and ranch dressing mix until the cream cheese has melted. Stir in beer.
4. Remove from heat and add the cheddar cheese a handful at a time, stirring until thoroughly combined.
5. Transfer cheese mixture to the prepared baking dish and bake for 15 to 20 minutes or until bubbly.

Serve with warm soft pretzels.


Oreo Cheesecake Cupcakes


Every word of that title makes me go yummmmmm! And yes, the m's are drawn out like that. For Christmas this year, I requested cupcake decorating supplies. Well leave it to my mom to not just buy something simple and basic. In my gift from 'santa' there was Wilton Master Tip set, disposable frosting bags, adorable 'fashion' cupcake liners and the mother of all cupcake cook books by the one and only Mrs. Martha. My mom had set me up for success. Therefore, ever since Christmas morning I had been dying to make these cupcakes. However, I know my ability to resist cupcakes and cheesecake AND oreos, so I waited until I knew I was getting together with friends so I could pawn some off on them! So far the reviews have been great and I am quite a fan myself.

Oreo Cheesecake Cupcakes

Source: Martha Stewart Cupcakes

Ingredients

42 Oreos- 30 left whole and 12 coarsely chopped (I used 6 chopped cookies as I only bought 1 package of oreos and wanted to have enough bases. The 6 suited the recipe just fine. I still ran out of bases as this recipe made 36 cheesecakes for me.
2 pounds cream cheese at room temperature (yikes, I know, that's alot of cream cheese)
1 cup sugar
1 teaspoon pure vanilla extract
4 large eggs, room temperature, lightly beaten
1 cup sour cream
Pinch of salt

1. Preheat oven to 275 degrees. Line standard muffin tins with paper liners.
2. Place 1 whole cookie in the bottom of each lined cup.
3. With electric mixer on medium-high speed, beat cream cheese until smooth, scraping down sides of bowl as needed.
4. Gradually add sugar, and beat until combined.
5. Beat in vanilla.
6. Drizzle in eggs.
7. Add in sour cream and salt.
8. Mix in crushed cookies by hand.
9.Divide batter among cookie filled cups, filling each almost to the top.
10. Place in oven, rotating half way through, for 22 minutes. Transfer to wire rack to cool. Place in refrigerator (in tins) at least 4 hours. Remove from tins right before serving.

Wednesday, January 6, 2010

Pesto


During my last internship, I was awakened to two amazing flavors that I had never dreamed of cooking with. First, garlic. Sure, I add garlic salt and/or powder to about everything I make but never had I minced my own fresh garlic cloves. So good!


Next, pesto. Amazing pesto, added to everything from pasta to sandwiches. I love the full flavor it adds to the most basic of ingredients! I have since came across several recipes calling for Pesto and when I went to the store, I couldn't find it. I was bummed beyond belief. But once I got my very own food processor, I knew this was first on the list to make. Since then, I have added it to a few meals that I will post about in the future. So stay tuned!


This picture by no means does the pesto justice. Once again, I encourage you to judge by taste and not by looks!
Pesto
Ingredients
2 cups fresh basil leaves, packed
1/2 cup freshly grated Parmesan-Reggiano or Romano cheese
1/2 cup extra virgin olive oil
1/3 cup pine nuts
3 medium sized garlic cloves, minced
Salt and freshly ground black pepper to taste
1. Combine the basil in with the pine nuts, pulse a few times in a food processor. (When using fresh basil, use the leaves and only the stalks that are connected to the leaves)
2. Add the garlic, pulse a few times more.
3. Slowly add the olive oil in a constant stream while the food processor is on. Stop to scrape down the sides of the food processor with a rubber spatula.
4. Add the grated cheese and pulse again until blended.
5. Add a pinch of salt and freshly ground black pepper to taste.
Makes 1 cup.

Sunday, January 3, 2010

White Chocolate Chex Mix


Yum....Yum...Yum...YUM!!! I am always game for food that involves dumping and mixing so when I came across this recipe, I knew it was perfect. Since first seeing this recipe, I have came across it several times now and one difference I see is that some people use almond bark instead of the white chocolate chips. Now, I don't know if I am still on my almond bark high from Christmas or if it truly does make the mix better, but I am a huge fan of the white chocolate chips. It's simple, quick, very yummy and makes alot! I separated the mixture into decent sized bowls because I have yet to invest in a Big Momma Bowl...my term for a jumbo bowl capable of mixing puppy chow. This is a pleaser for all ages and it went over amazing at a small New Year's get together we went to.


Hubbs approval rating: "Wow this is amazing. Hey, pass the bowl!"


Seriously though, thank goodness I gave half of it away because I keep munching!!!


White Chocolate Chex Mix


5 cups Cheerios

5 cups Corn Chex

2 cups peanuts (optional)

10 oz bag small twist pretzels

1 big bag of M&M’s (I used regular, feel free to opt in seasonal M&M's or I think peanut butter would be amazing)

3 Tbsp vegetable oil

2 (12 oz) bags Nestle Premier White Morsels


In a jumbo/Big Momma Bowl, mix the cheerios, corn chex, peanuts, pretzels and M&M’s.

Melt the vegetable oil and white morsels together in a double-boiler (I did mine in the microwave, just be sure to watch it) and pour over chex mix.

Mix with wooden spoon (to avoid sticking or pieces getting stuck in the groove)or if the bowl has a lid, shake the bowl to mix.

If desired, lay out on wax paper to dry or just let dry in bowl without lid on. ( I left mine in the bowl and had to work with it a bit to break chunks apart. Next time I plan to spread it out.)

Saturday, January 2, 2010

Count Chocula Cupcakes


I think cupcakes are one of the greatest inventions ever. Then again I am a fan of anything that is individually packaged for many reasons, portion control, easy sharing and/or sanitation for those who are anti germ. While scanning other blogs I came across these adorable cupcakes. I also purchased my first food processor and was beyond excited to use it! It's pure electric power now! These cupcakes turned out pretty good, they were a little dense for my liking but a nice change from your standard cupcake.
I was in a bit of a hurry to finish these before New Year's so I have to admit I used pre-made frosting. I will include the frosting directions in the recipe because I feel the dark chocolate frosting would really compliment the cupcake. Also, my frosting skills leave much to be desired. I am still trying to figure out how to swirl up and with the master set of Wilton tips I got in my Christmas stocking ;), I should have plenty of fun ahead of me!

Count Chocula Cupcakes
Source: MyBakingHeart
Yields: 12 cupcakes

1/3 c vegetable oil
1 c milk
2 c Count Chocula cereal
3/4 c white flour
1/2 c unsweetened cocoa powder
1 tsp baking powder
1/2 tsp baking soda
1/4 tsp salt
3/4 c chocolate chips
1/2 c light brown sugar

Preheat oven to 350 degrees. Line a muffin tin with paper liners.
Using a food processor, crush the Count Chocula cereal. (Or feel free to use my previous method of placing cereal in a zip lock bag, make sure to zip, place towel over to soften the sound and smash with hammer until cereal resembles a fine dust)
In a large bowl or stand mixer, join together the ground cereal, flour, cocoa powder, baking powder, baking soda and salt. Stir in the chocolate chips.
In another bowl, beat the oil and sugar together for 2 minutes. Add the milk and beat until well-combined. Resembles a frothy consistency.
Fold the liquid into the dry ingredients until just blended. Avoid over mixing!
Divide the batter evenly among the liners. Gently pat the tops to smooth them off.
Bake for 18-20 minutes. Transfer the cupcakes from the pan to a cooling rack and cool to room temperature. Frost as desired.

Dark Chocolate Frosting
6 tbsp butter
2 tsp vanilla extract
3 c powdered sugar
3/4 c dark cocoa powder
1/3 c milk

Cream butter and vanilla.
In a separate bowl, combine powdered sugar and cocoa powder.
Add dry ingredients to creamed mixture.
Slowly add milk until frosting reaches desired consistency, then beat until creamy.

Spritz


I have always loved the simplicity of Spritz cookies. Each bite envelops you in a variety flavors layered with butter. I also love that this is a cookie I can jazz up with various bold colors without having to cover with frosting. Initially, I thought Spritz cookies were complex...be it the cookie gun or mixing the dough. But to my surprise, they were one of the easier cookies to make. I bought the Cookie pro gun and could barely wait to get it out of the box! Instantly, I was searching online for the perfect Spritz recipe. The one I found was from All Recipies and it called for vanilla extract instead of almond and I chose to use Orange extract. Something I had seen from other recipies. I am not typically a orange flavoring fan and was a little concerned as I was mixing the batter that it wouldn't create the Spritz cookie taste I was looking for. However, I turned out loving this recipe! The cookies turned out great and were a perfect colorful addition to my holiday goodie treat trays.


Butter Spritz Cookies

Source: AllRecipies

Makes 3 dozen

Ingredients
1 cup butter
1 cup white sugar
1 egg
2 2/3 cups all-purpose flour
1/4 teaspoon salt
2 teaspoons orange extract (original recipe called for Vanilla extract)


Directions
In a large bowl, cream together the butter and white sugar until light and fluffy.
Beat in the egg, then stir in the orange extract.
Combine the flour and salt; stir into the sugar mixture.
Place desired amount of dough into separate bowls and add food coloring. ( I used gel coloring)
Cover dough, and chill in fridge for at least one hour.
Chill cookie sheets.
Preheat oven to 400 degrees F (200 degrees C).
Fill cookie press gun.
Press dough out onto ungreased, chilled cookie sheets.
Bake for 8 to 10 minutes in the preheated oven, or until lightly golden at the edges. (Mine only took around 7 mins)
Remove from cookie sheets to cool on wire racks.

Friday, January 1, 2010

Cookies in a box

This by no means constitutes a 'homemade' recipe but I'm going to take the viewpoint of enlightening others of the best boxed cookies available. My initial thought of having my sister visit for a couple days was, "How the heck am I going to occupy a 12 year old?" I made these Krusteaz cookies last year (found at Target)and really liked the taste and simplicity. Also, it was mostly fool proof and didn't want the struggle of attempting royal icing with E (the sis) when it would be my first attempt as well. The results were pretty tasty and the appearance...well...from far away...you get the point.

The beauty of these cookies was that everything came in the box, cookie cutters, dough, icing, sprinkles and food colorings. Below is a quick outline of our work. We sure had fun!